Tuesday, December 23, 2014

Odds 'n' Ends


Here we are, the end of December, and the hard work is behind us. After the Don visit there’s been some puttering and a lot of ‘one-man’ type work between the odd weekends of mud and rain. With Cara’s assistance I plugged any ‘goofs’ in the steel roof with screws, however we’ll need some dry weather to put the ridge cap on.

Ben stopped out for a couple hours one weekend and we put the last piece of west side metal up, leaving only the north to worry about.

With the assistance of the picker and a free Saturday, I put the final top rows of screws in the east and west ends, put up (and squared) the gable fascia pieces, then set to work on the west side getting the soffits sorted. I spent Sunday cutting and installing all the soffits on the north side, trimming the fascia metal to size, and working on the NW corner transition. By the end of the weekend, I had all the overhead metal work done.

And here it is the weekend of the 20th… With Ben’s assistance we framed out the front overhead doors with plenty of blocking, and got the first sheet up. I worked Sunday PM, continuing the sheetmetal across the front. If I were really playing it by the book, I would have started at the center of the north face and worked east and west to ensure the front was 100% symmetrical, but I’m sure it looks fine the way it is. The only things lacking at this point are a ridge on the roof, one corner to trim out (the supplied metal is scratched), and metal trim around the door openings before the doors and tracks can go in.


Monday, December 8, 2014

Siding Weekend


It was the Friday after Thanksgiving and the forecast called for semi-warm weather, but when I got out of the truck up at the road, it was anything but. The thermometer read 20F but the winds were really whipping and the ground was still ice covered. Ben was having some car trouble at home and I figured I better just call this off. This ended up being a smart move because after the sun came out, I pressed forward with the work I had planned, which turned out to be a one-man job anyhow. This included framing out an opening for the west side service door and installing the frieze channels and 2x4 nailing boards. Lots of fine tuning was required to get these to line up straight and still be within an inch of accepting the rear siding panels (which were pre-cut) while being level with where the soffits would attach. With that, Saturday’s siding plan could commence.


You couldn’t have asked for a better day temp-wise. We hit mid-40’s with a clear sky and warm sun. This was ideal for working on the gable ends of the building, but not so much the south side where the snow-covered roof was melting in the sun and creating a muddy mess below the roof line. That said, with a 9AM start, we put in the first rear sheet to prove out the concept and to set the alignment for the rest of the 45 linear feet. Piece of cake. Then we tackled the gable ends which required cutting each panel top at the correct angle of the roof. After a rudimentary check, the 4:12 roof pitch jibed with basic geometry. A 4 in 12 rise over the width of a 3’ panel meant a 12” slope for each. Using a Malco turbo-shear (which I cannot say enough good things about), we soon got the hang of panel lengths and made quick work of the job. By sundown, we had the bulk of both walls cut, installed, and screwed into place. I spent the evening on the net trying to figure out the best way to trim out the service door, not being satisfied with the ‘standard procedure’ which didn’t seem to address the issue of things like…rain.


And so it was Sunday the 30th that Ben and I had a few minutes before our buddy Don D. would roll up, along with my father, not far behind. We put up the partial pieces of frieze runner and leveled and fastened in the service door. The temps were not as kind as the previous day and we’d spend frequent sessions warming up in the car between jobs, but on the plus side, there was no longer a mud issue and the snow was GONE. Cara joined us around the same time and after some odd jobs, we launched into the rear panel install. The work was swift, with two people staging the panels through the back wall, and three aligning/fastening them down. I’d be surprised if it took more than an hour to finish the whole rear. 

With manpower available, we snapped chalk lines, put in screws, and even cut/installed the final two partial roof sheets using the Malco to get from one end to the other of those 18’ panels. Once again I found myself on the roof, wondering what might break my fall at the bottom. By 1:30 we were done and headed into town to hear the latest Don D. tales.

Monday, December 1, 2014

The Garage: Weekend 4


Up to this point, we had a total of 2 weekends invested, digging holes, setting posts, nailing girts and getting the trusses/purlins up, plus random off-weekend work whenever the weather cooperated, which wasn’t much. Add in some help from Ben on the overhang jacks and some bracing, and a 3rd Saturday for some solo-picker time getting the fascia boards on, and we were ready for the next installment.

Highs in the 40’s were forecast for the weekend of the 22nd. Though a major threat of rain/snow was in the cards for Sunday. I took care of a few details Friday after work and we were ready. Around 9AM Saturday everyone convened and we started the steel roof install. The Bosch tools made easy work of installing the (many, many) screws. The steel was dry enough that I could perch myself on the roof and slide/up down to fasten what Ben couldn’t from the ladder. By lunch we had the north slope done and were moving onto the south. The sun came out as we started on the NE end and it took everything I had to keep from sliding off. My efficiency dropped to 50% and my shoes did more scratching of the steel than grabbing. Somehow we finished up right before sundown with roof on the place. Short of a couple end strips, the most difficult job was DONE. We retreated for dinner and drinks and to complain about our aches and pains. Guess we’re not as nimble as we once were!

I took it easy on Sunday, only putting in a couple solo hours to cut/install the rear truss braces while the rain came down. Next would be the steel siding.


The Garage: Weekend 3ish


The weather got cold and the snow got deep, burying any lumber stacked on the ground and making outside work a real bear. The high temps plunged into the teens and any after-work, work, simply couldn’t be done on a daily basis. Add to that a 90 minute window before night fall each day and any work was a scramble. That said, I got the braces cut and installed in the corners, buried a PVC line out for power, and capped the skirt board ends in prep for cement.

The next major event would be putting on the steel roofing. In order for that to happen, the overhangs would have to be installed. There were a couple small things left to do before that and Ben came out to lend a hand. Diagonal purlin braces and supports for the front trusses then meant the external bracing could come down. For once the weather was cooperating.

The crew got a reprieve for weekend three and I worked solo on putting up the 2x6 fascia boards and shimming them into line on both gable ends and along the front and rear. Some purlins had to be trimmed in place to smooth out the fascia, but it wasn’t too bad of work, aside from frequent breaks in the car to keep my fingers and toes intact. When the flurries rolled in mid-afternoon, I hitched up the picker and headed back to the lodge. It was getting dangerously COLD.

Tuesday, November 25, 2014

The Garage: Weekend 2

Day 3:
The threat of cold temps and snow loomed in the forecast for Monday, and we knew we had to make some headway before the white stuff hit the ground. I had taken 2 hours off work Friday afternoon and tried to get ahead on any small work that could be done, which primarily consisted of installing the grade board after finding slab height, then marking the posts for the new header height.


8AM, I got up to the site and measured for the small sections of grade board that would go between the doors. I got those cut as Ben rolled up and we set about installing the headers across the front.

The day’s primary objective was to get the trusses up, and hopefully make some major headway on the purlins. After marking and blocking the east end for the proper truss height, Ben, Cara, myself and the parents lifted one end up onto the captured block, then hoisted the other end up onto the truss. After some adjustments with a BFH, we ran screws and spax through it, committing it into place. In a matter of a few minutes, it was up and fastened. We did the same thing on the west end, then pulled out the string lines to see how straight the end walls were and adjusted as appropriate.

The next truss would be a little harder. This time, there’d be no lateral posts to help keep it in place while lifting. To give it a little stability, I screwed a 20’ long 2x4 to it from the point on down and the girls used this to keep the truss upright while Ben, my dad and I lifted from each end. Again, in just a few minutes it was up, but Ben and I had just about spent ourselves for the day lifting and fighting it and nobody wanted to go through that again. In the interest of working smarter and not harder, we backed the picker into one of the ‘stalls’, removed the header so we could raise and rotate the boom so it was in the center of the building, and decided to use it to do the heavy lifting. The next truss was a breeze, but truss number 5 fought us…and then the rope broke! The very definition of “not good”, it dropped in a controlled way and luckily nobody was in the fall-path.

While the trusses were going up, we began to run lateral braces across the bottom chords to give them some stability as the wind was really whipping. We finished with truss #6 using a heavy duty tow strap which would easily carry the weight. Then maneuvered the picker out and restored the header section. It was early afternoon and the parents’ took off while we finished up additional bracing. Ben and I then put up the second row of headers as a combine and tractor pulling a wagon came blasting in and headed for the field. We worked while they got the combine header on, then started to wrap things up. There was still some evening light but we were exhausted. A little Seafoam action in the DeVille capped off the evening. We were now ready for purlins.


Day 4:
It was 8:30AM on Saturday when I crested the hill with the 40’ extension ladder which had already toppled off the truck once, and spotted Ben turning off the main road. We dragged out the tools and radio, and while the thermometer said high 40’s, the wind and overcast sky made it feel about 10 degrees cooler...that is, until you started working. Sunday would teach us a very good lesson on hard labor. Before anyone else showed up, we attempted to install the overhang jacks on the rear. Things went from bad to worse- the jacks needed trimming to fit right, the east truss wasn’t where it was supposed to be on the rear post, bits were stripping, and the parents arrived along with Cara and they had nothing to do but watch us try to fix the situation.

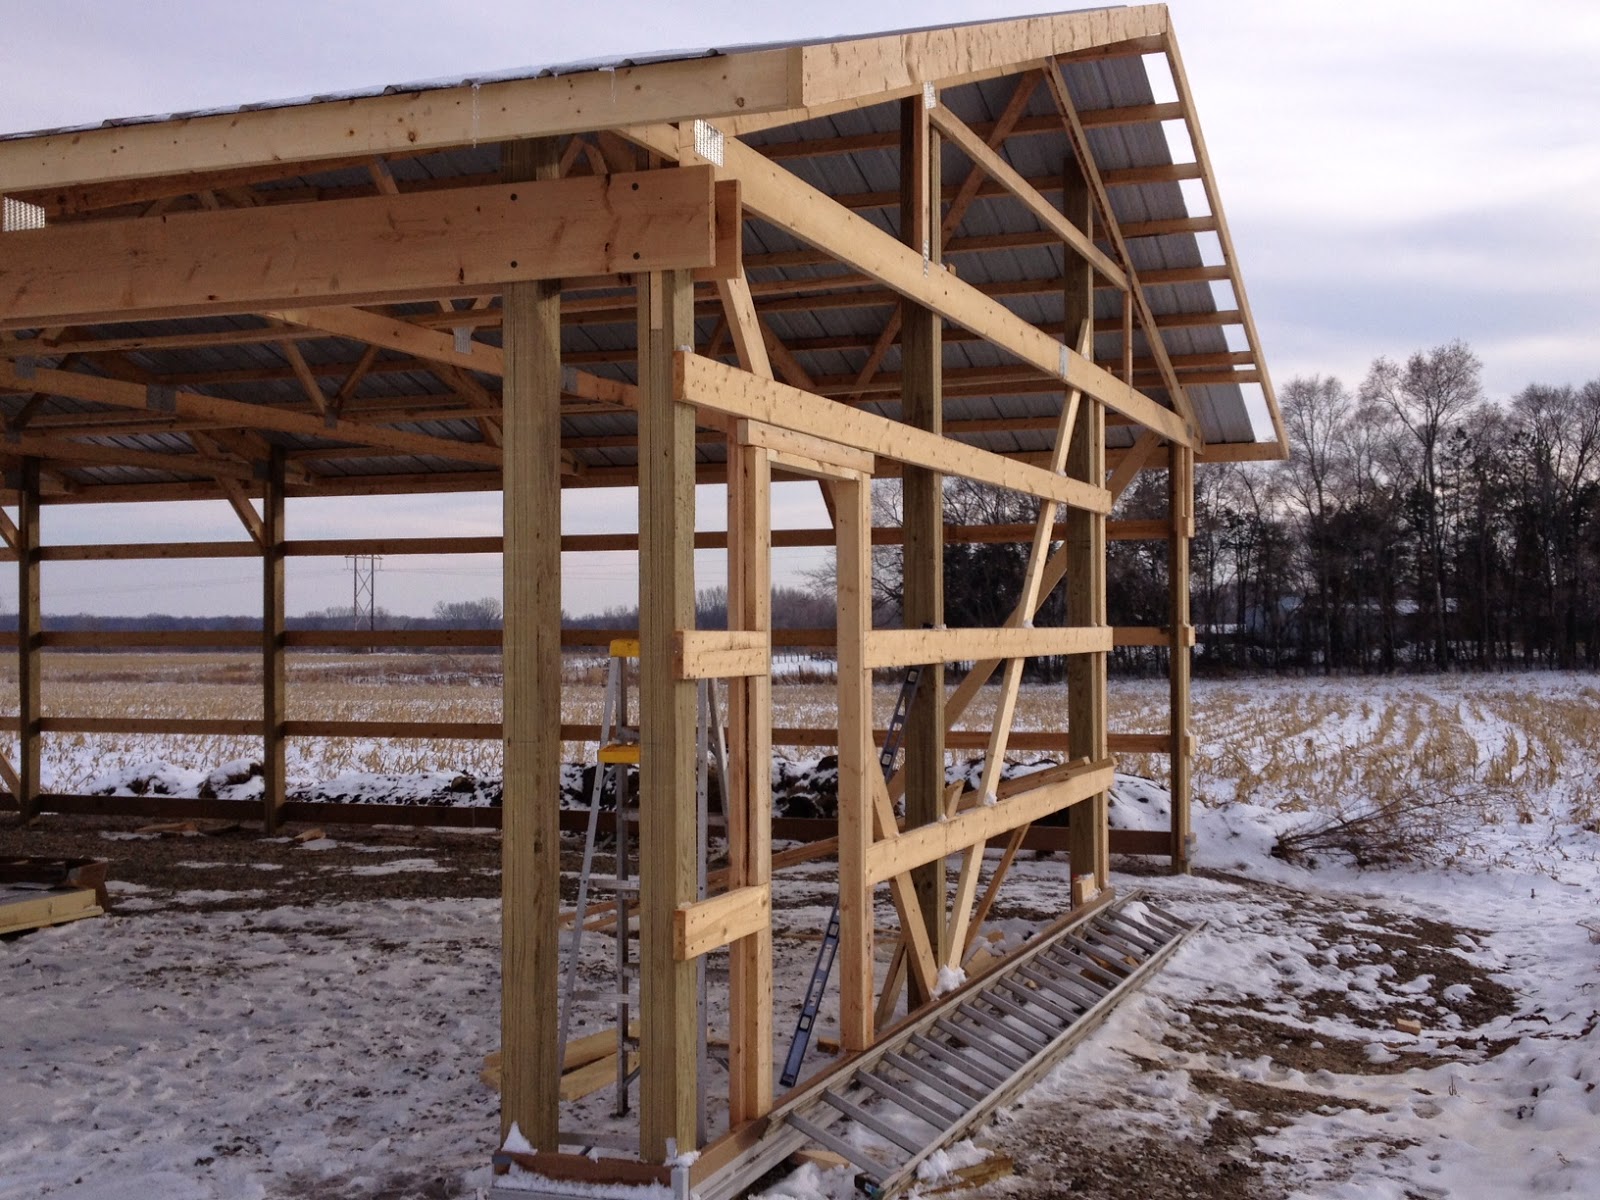
With geometry corrected, we proceeded to install the purlins. Purlins are 2x4s that run on their edge to support the weight of the steel. They get nailed to the trusses with, get this, 6” long nails! With me scaling the building, and Ben on the extension ladder, we toiled our way across the rear and up to the peak running these 2x4’s, hammering in these spikes with the biggest hammer we could find, and swinging both arms to get them to go in. By lunch we were exhausted, but we had the rear roof section done.


The McDonalds did not hit the spot, and I felt sick to my stomach the rest of the day. By mid-afternoon, my feet were burning, every muscle ached from balancing precariously from the roof structure, and Ben looked like he might drop at any minute. Somehow we persevered, completing all but the top row which would require careful cutting before installation. Installing these isn’t a very good use of people’s time. It’s essentially two people, one at each end of a board, nailing these things in, and a third to pass up tools and materials. That said, I know I appreciated the help.

Before we called it a day, we cut/installed the jacks for the front overhang and pulled down some braces. Victorious, but flattened, we all drove to the Wild Hare in our construction garb to drown our aches and pains in cold beer and boneless wings. A skilled crew would probably have trusses and purlins set in a day if not sooner, but accomplishing it all in a weekend isn’t bad for a ragtag crew like us. 


Tuesday, November 18, 2014

Poncho Check-In

Now that we've got snow on the ground, it's time for a Catalina report. The good news is she's running well. The original carb is back on after fighting a stuck check-ball. Fighting isn't the right word. Turns out there are two check balls in these 2GC's and whoever rebuilt it last accidentally swapped them. The end result? Having to drill out the accelerator pump passage from below to force the ball out with a stiff wire. No other method would work. Baking in the oven, forcing with an air nozzle, trying a syringe of oil, nothing. Heavy Duty JB Weld epoxy was put into service to reseal things and so far, no leaks. 

There was that encounter with a very squeaky ball joint- and zerks that refused to take any grease. A combination of physically removing the stubborn zerks, and forcing a liquid lubricating penetrant into the joints first, then letting the grease gun force this more viscous fluid into the old, unreachable grease, did the trick. Eventually they all took grease and the suspension quieted down.

Running with a smooth trans, quiet exhaust and new tires has made all the difference and she now has around 2 months of daily driving on her (mid-Sep to mid-Nov). Now the salt is out so she probably will get stored until the spring. Just a few small things to keep me busy, but overall, mission accomplished! 


Friday, November 7, 2014

The Garage: Weekend 1

Background:
With a ¾ mile long driveway, Iowa winters, dusty summers and muddy springs can make getting in and out difficult, or at the very least, a dirty affair. One could gravel the entire run (a multi-year commitment at this point), but this is still no guarantee for winter access, and car washing would still be pointless. For roughly the same price, a building could be constructed up near the blacktop to act as a winter depot, to provide year round storage, and to provide summer parking for the cars I’d rather not see destroyed by sinkholes, mud, and other suspension-battering obstacles.

Initial Design:
A post-frame building of size 30x45 was ultimately decided upon to allow for 4 cars to be parked side by side, plus 2 across the rear. Or substitute a long truck with plow and some rear storage, or even a utility tractor. With 9’ truss spacing vs. 8’, the only cost-up from going to 45’ from 40’ is the price of some sheet steel and 2x4 lengths. No additional posts were needed; seemed like a no-brainer.

After running the estimate on several variations, I settled on a full 2’ overhang (not cheap, but aesthetics is important given the location), a solid color side wall and contrasting trim. Four 9’ wide doors span the front, and a 9’ wide, high clearance door, will be mounted on the west side. I upgraded for laminated posts to take some of the difficulty out of plumbing twisted 4x6's, and a no-rot composite gradeboard which provides a ledge for the side steel which should make sheathing the building easier. The trigger was then pulled and the whole BOM went out on order with a 2-3 week expected delivery date.

Pre-Work:
Meanwhile, the site would need to be prepared. The farmer harvested a couple acres of corn in the general vicinity, Cara and I pulled the old steel fence posts and wire, then set locating stakes for the corners. A week later a local construction firm had leveled the area and brought in rock to build up a firm base. 48 hours later we were putting up posts.

Here we go:

Friday after work, I picked up the rental skidloader with a 20” auger. 14” diameter concrete discs drop into the 48” deep holes and I wasn’t sure if this would be the right size. Any smaller and the enevitable cave-in would be a big problem. Any larger and you have a lot more material to clear out…and to shovel back.  In retrospect, this was the perfect size. Got it home and unloaded, hauled the cherry picker to the site, and talked to Menards on the phone. “Could the delivery be postponed until 7:30AM Saturday?,” asked the driver. “Yeah, that’s fine.”

Saturday, 7:30AM. Kickoff. I loaded the truck up with 2x4 braces, steel pins, ladders, tools, etc. It was 20-some degrees but the wind wasn’t bad and the sun was just coming up. Ben pulled up in his ’61 DeVille and he, Cara and I set about positioning flags for the holes into the jagged gravel. I had interpolated the plans’ locations into ‘post-centers’ the night before to make things go faster since the plans measured distances based off girt boards that didn’t yet exist. It wasn’t long before all was set, and copious cross-checking for squareness was complete using the 3-4-5 rule. Ben ran the auger while Cara and I shoveled away the black soil and thick clay the blade brought up. About this time the delivery semi had arrived, and it was Keystone Kops as they tried to unload the trailer. Poor planning on our part, we assumed they would stage the material where we could access the posts first, rather than stacking the last-needed items on top. But we were too busy making progress with the skidloader to notice. After a couple holes, and after hitting my head twice on the steel support boom and nearly knocking myself out, we had got our rhythm. Cara and Ben then took over as my parents arrived and did a cracker-jack job of drilling all 18 holes. 

Now, the plan specified 21 posts, with 2 between each overhead door…this put the spacing of the siamesed  posts on the order of less than 2’ center-to-center. How the heck would we drill that? Ultimately, we abandoned this approach for the intermediate supports between the doors, drilled a single hole with single post between each, and I’ll frame out the area between the doors with conventional lumber. For stability, we attempted the siamese operation on the front corners, but this required some ‘cleaning up’ by hand.

After breaking for lunch, we had all our holes ready, poles being prepped with uplift blocks and going into position and all our cement discs in place, despite taking on some water and backfilling with gravel. By the time we stopped for the day, we had every post in a hole and our corners set and plumbed. This included an hour for returning the skidloader by 4PM. Aching from the heavy lifting, we called it a day and hit the Wild Hare for dinner and pitchers of cold beer.


Sunday:
One side activity on Saturday was trying to figure out the connection of the composite grade board pieces. We couldn’t install them because we couldn’t find the connectors. This would prove to be a blessing in disguise later.

Suffering at the hand of Daylight Saving Time the night before, we started the day at 8, but knew it’d be dark just after 4PM. Sunday would be a lot less labor and a lot more measuring, marking and hammering. The next move was getting the perimeter posts plumb and sited. Ben and I used a mason’s string and 1.5” standoff blocks for alignment and after bracing each post, Cara and my parents would follow behind, filling each hole. By lunch we had the posts plumb, straight and backfilled.
The next order of business was determining ‘level’ around the building. A 50 clear hose served as our water level and made quick work of marking the corners. Ben and I then snapped chalk lines around the perimeter to mark the posts. Measuring from this point, we could determine girt locations and spacing. Cara and my Mom ran off to Menards to try to find the whereabouts of the missing skirt board connectors while the men cut and installed the girts. Towards the end of the afternoon the girls showed up empty handed, but a Menards pickup truck was close behind. Video had showed the box of parts had left on the semi, but it sure wasn’t here, and the parts were special order- not something they had on hand that day. Not that we cared at that point…but we’d need them soon. The cement slab could be poured anytime after skirt board installation, and the forecast for the following week was none-too promising.


With sun going down, and girts complete, but headers too short due to the decision to eliminate 3 posts, Ben and I put up 2x4 spacers to pull the front columns into plumb and make header install later much easier. We were about 95% ready for truss install.