The majority of parts for this project have come from Rockauto. Can't say I like paying the separate warehouse shipping charges, but it beats the nonsense I've had to deal with at the local parts stores.
For the brakes, cylinders were replaced all around with Raybestos (they have a terrific website with cross reference numbers for everything, including this 50+ year old car). Canadian-built Pontaics use different size brake components so order carefully.
Here are the correct wheel cylinder numbers if you're redoing the brakes:
| Wheel Cyl Front L: WC32091 | ||
| Wheel Cyl Front R: WC32092 | ||
| Wheel Cyl Rear R: WC7564 | ||
| Wheel Cyl Rear L: WC7563 |
For brake hoses, the front takes two BH5433 and the rear axle uses a single BH26960. Be sure to pick up some hose retainer clips while you're ordering as the originals are sure to be a rusty mess (Dorman HW1457).
Now take note, this might save you some running around. The hold down pins on the rear wheels are a different length than the fronts, and no hardware kit is available. What you want to do is order two of kit H4020. Each handles an axle and includes all the springs and cups. Then order yourself H1105. This is a package of 4 pins for the rear brakes. Check eb*y for stuff like this, it can be had cheaper than the local store which won't know what you're talking about anyway. You'll also need two packages of H131; these are the brake shoe return springs. With that, you should have everything but the adjuster springs, and those rarely need replacing.
My front drums were in good shape and my plan is to re-use them as is. However the rears were another story. Heavily gouged and machined to their limit. Heavy-duty cars (like wagons) used 2.5" shoes and drums but the Cat uses 2". Ames Performance came through with the correct drums: PR448W (59-64) is just the ticket.
For brake lines, I used pre-made straight sections, but with a twist. A friend loaned me his Ridgid flaring tool model 345. If you do any kind of tubing work at all, pick one up. With it I was able to shorten up a long length of the pre-made for the rear axle, and needed only a single union for the line from front to rear. This union also made it easier to bend and install the two lengths independently. Incidentally, the brake lines run along the middle of the X-frame while the fuel line runs along the LH side of the body. Self-locking clips retain the brake line and mine were reusable (which means yours probably are, too).
 |
| New cylinder, springs, shoes, hold down kit. Front drums with integral studs in background. |
With a car like this you've got to work with what you have. Simple upgrades for safety's sake make a lot of sense. For $5 a pop, I upgraded all four headlights to GE halogens. The connectors were in excellent shape with no signs of corrosion so I wasn't concerned about voltage drop issues. Unlike some of the H4 conversions, these are sealed beams and are practically indistinguishable from original equipment. New top-post battery cables made sense, too.
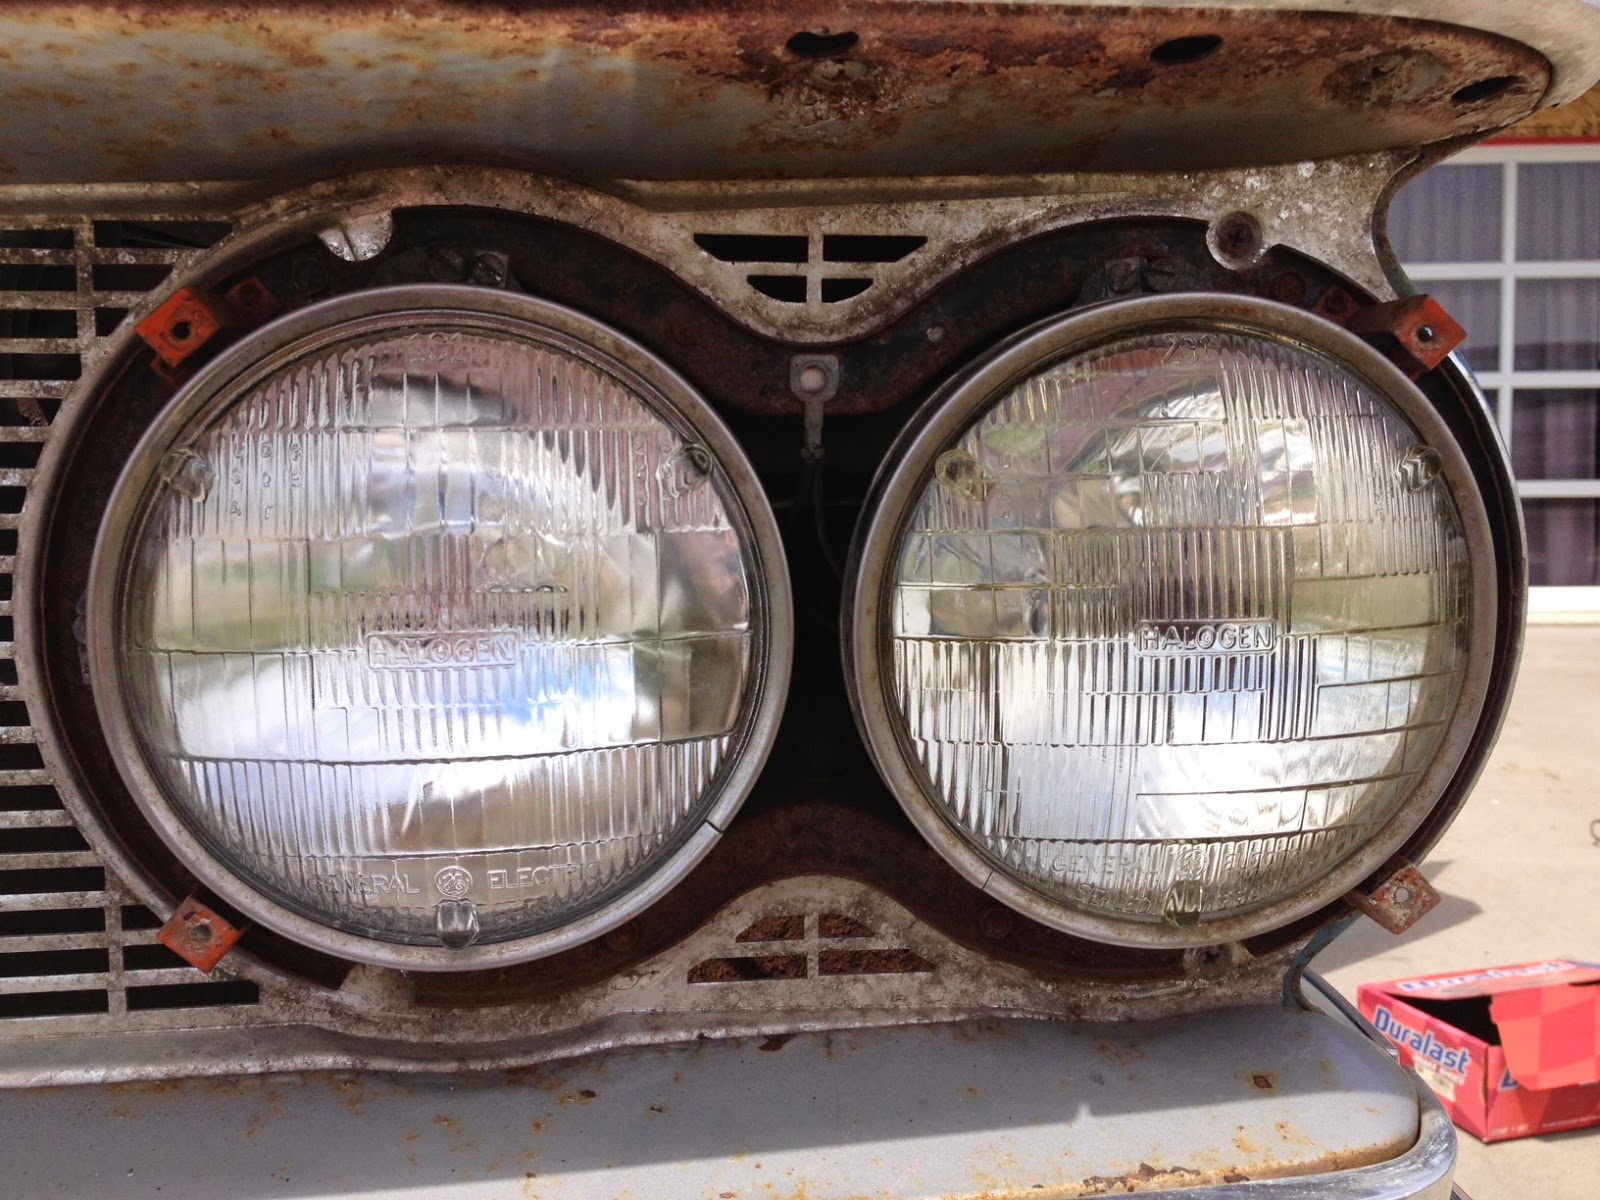 |
| New Halogens |
The tires arrived and it was time to get them mounted. I could either spring for big-buck wide-whites, cheapo black walls, or something in between. After reading reviews, I rolled the dice and ordered a set of Hankook Optimo H724's. These are 14" radials with a whitewall and available for order through wally-world or online. Best of all, the entire set with mounting and balancing cost less than a pair of the wide-whites alone. Since this is my only car with 14" rims, and it's unknown if it will even drive under its own power, this made a lot of sense.
My buddy Ben stopped out in the afternoon with the goal of changing the timing gear set. Things did not go as planned. The balancer pulley mounts to the crank flange via six 5/16 fine thread bolts. These were removed easily enough. The crank flange is then secured with one large center bolt that theoretically can be removed without too much effort. In order to keep the crank from rotating during this process, we initially bolted a length of angle strut to one of the open pulley-mount holes such that the strut would rotate, contact the frame, and prevent any further rotation. What we ended up with was a bent strut.
Next we tried a stout piece of heavy gauge door track with a c-profile and positioned it such that rotating the crank would force the track downward into wooden blocks on the ground (a pushing, rather than bending, action). The engine rose up to the extreme of its mounts and the frame wasn't far behind. we decided not to risk further damage.
Next we bought some grade 8, 5/16 bolts and used chain. If we couldn't push, then we'd pull. With the chain fastened to the frame and bolted to the pulley mount, Ben gave it hell with a 4' pipe. Laterally there wasn't much to give, and we decided to bolt the engine down just in case. And still...it was pretty clear we were going to break something before that bolt was going to loosen.
Short of pulling the radiator and hauling the car to a shop with a pneumatic impact, we were at a loss. At least we knew the engine ran (and sounded good) in its current state. After blowing the afternoon, we decided to at least install the new water pump, bolt on the fuel pump and call it a day.
No comments:
Post a Comment